Saturday, April 27, 2013

Lexie's Wedding Dress! Part 1 - Chelsea

So on Wednesday, I was scheduled to get off work early, we were needing someone to leave early for pay role, and Lexie and I had already accomplished our main task for the day and the store was so over staffed and under shopped that afternoon that we volunteered to leave early so we could go fabric shopping for Lexie's wedding dress! Aren't we just so nice like that? ;-)

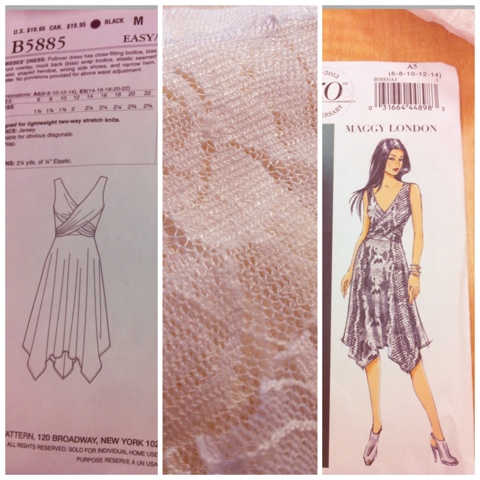
We started by looking at patterns since we knew that the pattern we chose might dictate what kind of fabric we needed!  And boy were we right! (for non sew-ers, all the available patterns a brand has they advertise in a great big giant hardbound catalogue) After digging through the dress sections of half a dozen pattern books, we found the perfect pattern for Lexie's body type and design preferences and beach friendly.  Only one little hitch. It was jersey knit only!  Jersey Knit wedding dress?!  Why not!  We found a lace that had enough stretch to it that it should work, and we found a true knit fabric that exactly matched the lace fabric!  We also found some antique looking broach/pendanty things we're going to add to the shoulders.

Thursday afternoon I took out the pattern instructions and studied them forwards and backwards.  The instructions look pretty clear and simple and straight forward which I'm grateful for!

Friday I had the whole day off with nothing planned so I was going to get started in the morning and work all day getting the pieces cut out and hopefully get a good chunk of the sewing done! I was itching to get started!  But the best laid plans of mice and men and crafters got shortened on one end when I got a last minute desperate request from a friend to babysit Friday afternoon. It is so rare that I can say yes that I was happy to help her out! But that meant I could only work until about 3. Oh well.  Then on Friday morning I wake up to find out that my mom is having an important event on the far side of town and forgot a few things she really needs. So I delivered them and then visited a bit and got her lunch while I was there, but I didn't get home til 1.  And I needed to finish up a project for my store manager and it had a much shorter deadline.

So needless to say I haven't started cutting or sewing at all!  But I have Tuesday off and I hope to make some good progress then!  In the mean time here is a sneak peek at the pattern and the fabric we picked out!
Also if you want to see some of the inspiration photos we looked at before we went shopping you can find them on my pinterest page.
 

Monday, April 22, 2013

Under Construction

Hey everyone!

Sorry we've been absolutely rubbish about keeping you updated! Let me try to catch you up on why we've been absent from online! We haven't forgotten or given up on Zoe Cara... She's just had to slip a little lower on the to do list. More on that in a bit. Rebecca has some fabulous projects in the works, but isn't sure yet how to finish them. If we ask nicely she might give us some sneak peeks!

Rebecca had gotten her nursery all adorable and her craft room nicely set up, when they decided they wanted roommates! The first lovely couple wasn't able to move in due to technological issues, but I suggested my fabulous friends Emily and Trisha (check out Emily's etsy shop 104 Jewelry!). So the next several weeks were spent doing a giant reorganizing shuffle, now Rebecca's craft room is consolidated into her closet, and a book case in the living room, and the nursery is in Rebecca and her hubby's room. Don't worry, there is plenty of space for them to share!

So now the dust has settled, but my gorgeous and precocious goddaughter (I'm biased, but complete strangers walk up all the time and say how pretty she is!) has just reached the crawling/almost walking stage and needs almost constant supervision, which has made craft time an endangered species for Rebecca! Currently most of her creative juices are being used to help her daughter play and learn and develop and she's doing a fantastic job so far! Hopefully as they get a routine established Rebecca will be able to get a little more craft time in.

And what have I been doing? Juggling! Not bowling pins or bouncy balls, but working 5-6 days a week, going to two different churches, spending time with family, teaching an ASL one day, helping in a 1st grade math class another day, helping Trisha and Emily get settled in, helping Becca get prepared for them to move in... It's been great but hectic and on the rare occasions when I have a few hours to myself, I hide and veg! However! School is out! Or almost out atleast! And that will help open up my schedule quite a bit actually!

I still won't be able to start crafting right away because of the"Big Two Projects."

Project 1. Make a wedding dress for my manager at work. (I gave her her own board on our Pinterest!) She is having an informal family only beach wedding in July and wanted something very simple in design, not floor length, but still made out of white lace and ribbon etc ;-). I'm excited and nervous! I've made fully functional and wearable and even cute clothes before, but not spent much time working with lace! So bring on the practice scraps and bring in the google!

I promise to show lots of pictures as I go along!

Project number 2. "The Great Room Swap". It started on my birthday. My mom asked "are you sure...." And our entire summer got taken over! But that will have to wait for the next blog post!

Hope everyone is enjoying the green spring and not suffering too terribly from allergies!

Chelsea

Saturday, March 16, 2013

"Sunshine" Necklace for a very special lady!

Last Summer I had the incredible privilege to go to Romania with a group from my church and run a week long camp for some very special teens and young adults!  They all live with other special needs kids and adults at the Tanner House with Tata Bruce and Mama Sandie.


Recently Mama Sandie contacted me about a custom order. She needs a grey and yellow necklace and earring set to go with her favorite grey tunic. Her family is having it made for as special gift.  I was so honored that she asked me! She gave me several photos to give me an idea of what she was looking for and a picture of the tunic she's trying to match. She said the yellow she wanted was the yellow in the rose focal bead.


Guess what I found! During a trip to my favorite bead shop in Georgetown, I found nearly the exact same rose bead! Found lots of other yellow and grey beads too. I sent pictures to Sandie and these were the ones she liked best. I ended up getting more than I probably needed so I would have plenty of options!


Everything was going great and I was almost done when I ran into a problem! the grey spacer beads I found were too large to let the yellow rose beads lay flat! Oops! So now I need to take another trip to the bead store to find some smaller spacer bead options!   Sandie wants to be surprised so I can't post pictures of the finished piece until she gets its and has a chance to see it first!  But here is what "Yellow Rose Necklace Version 1" looks like!


Wish me luck!

To see lots of my completed jewelry make sure you stop by our etsy shop!

To learn more about the incredible work Mama Sandie and Tata Bruce are doing you can visit their website.

How to be a "fashonista" before you count to 10!

This post is dedicated to my amazing, smart, fashionphobic friend T.

So as most of you know my day job is working at Dress Barn (a ladies clothing store). So I'm a professional at giving fashion and style advice! ;-)

Frequent concerns/questions I hear include: "I never know what goes together" "How do I accessorize?" and for people needing a whole new wardrobe... "Where do I start?"

The Answer?

Start with your favorite color. Or the color that looks best on you. Build on that.  I recommend you start with 10 things:

1. A great fitting pair of jeans or slacks (disclaimer: the jeans I have on in the photos are NOT my favorite pair, but I happened to have everything else I needed to I went with it)

2. Flattering T-shirt or Tank Top

3. Coordinating cardigan/jacket

4, 5, & 6. Earrings, Necklace, and Bracelet in the same color family (note that they don't have to be a perfectly matching set)


7 & 8.  2 pairs of shoes. 1 pair sensible and versatile and 1 pair in a fun color or eye catching style. Express yourself!


9. Scarf - I may do an entire post someday on how much I love scarves. Doesn't matter where you live, there are tons of light weight ones for warmer weather! Plus, adding 1 more scarf that coordinates can completely change the look of the outfit!
 10. This one is semi optional. A great belt. I know not all body types look good in belts, but experiment with different colors and styles. If you find one you like, you'll be amazed how many extra options it can give you! (notice in the pictures below that never once does the belt go through any actual belt loops!)


Once you have your starting 10 pieces, adding more will be so much easier! For example: I have other purple necklaces and earrings I can mix and match. I have a Maxi Dress that will go with the cardigan and the jewelry!  If I want the outfit to be dressier, I can add a skirt or a pair of nice slacks. I have a lacy purple cami for a more feminine feel! Keeping your main wardrobe in one color family makes looking great easy! Once you've gained confidence from all the great compliments you'll start getting, then adding in other colors gets easier!
Believe it or not, the scarf and earrings above can actually be swapped out for the scarf in step number 9 and the earrings in step number 4 for a whole new look with just two changes!  Easy peasy!

And there you have it!  Apologies for the poor lighting and "selfies" this was a VERY impromptu photo shoot!

 
If you'd like to see steps 11-20 for what to do next, leave a comment and let me know! Have your own favorite fashion tricks? Please share!  Happy Shopping!  
~ Chelsea

Credit where credit is due:
T-shirt and Black shoes came from Target
Jeans came from Dressbarn
Cardigan came from Hannah D's
Earrings I made!
 

Thursday, March 14, 2013

Blue Lagoon

So after a multitude of technical difficulties... I've finally (with lots of help from my fabulous dad) got my camera and computer talking to each other again and all the different programs playing nicely!  After getting 999 (no joke) photos uploaded and sorted, I can finally start listing things on Zoe Cara again! Yay!


So with out further ado... Check out the Blue Lagoon! New 3 piece jewelry set added to our etsy shop!


Like us on facebook!
Follow us @zoecaraboutique
Visit Zoe Cara

Monday, March 11, 2013

Roses from Cuttings

For Valentines Day last month, Nate (my husband) almost got me a bouquet of roses, but he changed his mind, remembering that I had I told him that I wanted a rose garden. I'm no dummy, and I used to work in a flower shop- as lovely as they are, those token v-day bouquets are short lived and overpriced. I want to look at and smell roses for months on end! Luckily for me, my hubby is not afraid to get dirty.
Since Nate is just starting a new position on the development team of with a local youth center and his income there is support based, things are a little tight in the financial department, so we wanted an affordable option. I had found an add on Craigslist of a woman who was trimming her rose bushes and giving away the cuttings; she had 10 varieties. Nate picked them up and made a quick stop at home depot to get the potting soil, mulch mix, and growth minerals. We ordered the rooting hormone from amazon.We already had a few small plastic planters to work with and used some glass jars for the rest.
We looked at several online tutorials and read some product reviews. I like what we came up with. We have 4 sprouts from each type of rose. The lady who gave us the cuttings also included seed pods for several of the varieties that she had better luck sprouting from seed, so I also have a few containers that are set aside for seeds. The whole process was pretty simple (note: simple does not necessarily mean mess free). We mixed the potting soil, mulch mix, and growth minerals, hydrated the soil, filled the planters and jars and hollowed out the holes where the stems were going to go. Then we cut the healthiest looking stems off the larger branches measuring 6-9 inches from the tips of the branches, removed the lower growth from each stem we cut, and made sure we had made clean 45 degree angle cuts. Next we dipped the cut ends into 2 inches of water, shook off the extra drips, dipped them into the rooting hormone, set them into the holes, careful not so scrape off the hormone on the way into the hole, and covered them with the extra soil from the holes. I used popsicle sticks to label them.
Pretty simple really. We are keeping them inside for now on a bakers rack right in front of a window, we keep the soil pretty moist and water them once a day with a super growth mixture. If all of them take off, I'll have 44 plants this spring to put in our currently barren yard. Although, I'd be happy if we got 50% of them to sprout considering we've never done this before. My next project is to prepare the soil outside.

Here are the pics of my rose garden project.


Sunday, February 17, 2013

Ladies For Life Luncheon - PICTURES!

So I was hugely blessed and encouraged yesterday by how well the Luncheon went! Both by the speaker and the testimony, and by all my wonderful family and friends who came!

My dad and both my brothers got up super early (for a Saturday) like the angels they are and went with me to Hutto at 8am to help set up tables and chairs. I set up the display board (ended up getting 3 large black and white posters printed at fed ex office for $20 total! And it was so much easier than trying to cut and mat several dozen white boxes myself!

I did NOT volunteer to help plan the center pieces this time (I still remember sawing candles short and sorting several dozen mismatched vases and candle holders from the Christmas banquet ;-D), but I helped set out the flowers on the day. It all turned out great! A surprise when I got there... The programs were printed on red paper (I was expecting pale pink) and they looked great, and you could still see the lacy hearts in the back ground. (We decided to use the design with 3 large hearts).

I'm hoping to get pictures of the cardboard testimony later, but I was in it so for now, here are snap shots of the info table and the guest set ups from before the event started. The two lovely blond ladies are the president of our "board" and her daughter who is the newest member of our board! Both incredibly sweet gracious fun people!

I'm really proud of how well the display board turned out since I've never done a project on that scale before! Certainly not designed entirely in Office Publisher.

Huge thank you to Star of Texas Events for always being so wonderful and donating all the chairs and tables! And thank you to Hutto Bible Church for hosting us again this year! Looking forward to 2014!

Keep in touch!
Zoecara.etsy.com
Zoecara.blogspot.com
www.facebook.com/zoecaraboutique
twitter @zoecaraboutique